Back to Blog




Informative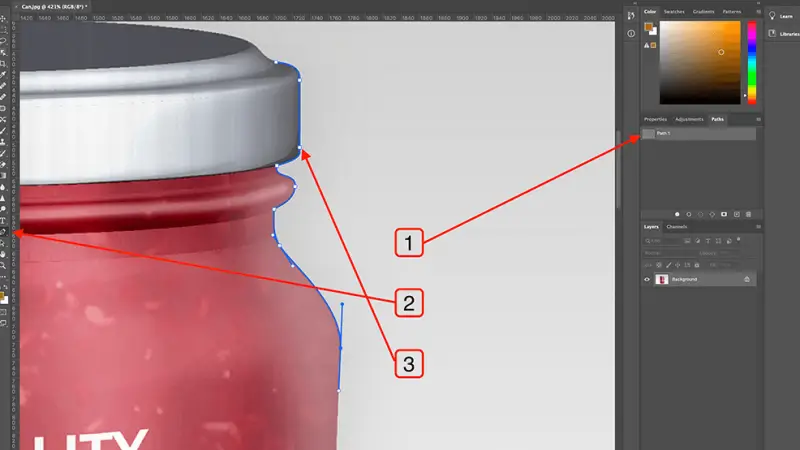
How to Create a Clipping Path in Photoshop: The Complete Guide (2025)
September 9, 2025Whether you're a professional photographer looking to enhance your product images or a graphic designer preparing assets for a client, knowing how to make a path in Photoshop is an essential skill. In this comprehensive guide, we'll cover everything from the basics of creating a path in Photoshop to advanced techniques that will elevate your editing capabilities.
Many people struggle with photography post-processing, especially when it comes to isolating subjects from their backgrounds.
Even experienced photographers (or "photographhs" as some mistakenly search for) need precise editing tools to achieve professional results. If you've ever wondered how to take your photography to the next level through precise image editing, this tutorial will show you exactly how to make work paths in Photoshop that deliver exceptional results.
What is a Clipping Path?
A clipping path in Photoshop is a closed vector path or shape used to cut out an object from its background. When applied, everything inside the path remains visible while everything outside is hidden or removed. Think of it as a digital cookie cutter that precisely outlines your subject.

There are three main types of clipping paths:
Single Layer Path - The most basic type, isolating a single object from its background
Multi-Layer Path - Used for complex images with multiple elements requiring separate paths
Illustrator Path - Created in Adobe Illustrator and imported into Photoshop for specialized workflows
Unlike other selection methods, clipping paths provide pixel-perfect accuracy, making them ideal for professional photograpghy and design work that requires clean edges and precision.
When to Use Clipping Paths
While there are multiple ways to isolate subjects in Photoshop, clipping paths excel in specific scenarios:
Products with hard, defined edges - Ideal for jewelry, furniture, electronics
E-commerce product images - When consistent white backgrounds are required
Print materials - Magazines, catalogs, and brochures that need clean cutouts
Composite images - When placing subjects in new backgrounds
Multiple platform usage - When images need consistent presentation across web and print
For subjects with fuzzy edges like hair or fur, other techniques like layer masking might be preferable. However, for clean, precise cutouts with hard edges, nothing beats clipping path Photoshop techniques.
Essential Tools for Creating Clipping Paths
Before we dive into the step-by-step process, let's familiarize ourselves with the essential tools and features in Adobe Photoshop that you'll need for creating professional clipping paths:
Pen Tool
The Pen Tool (P) is the cornerstone of making paths in Photoshop. It creates precise vector paths through a series of anchor points and handles. For clipping path work, this will be your primary tool.
Freeform Pen Tool
The Freeform Pen Tool is an alternative that allows you to draw paths as if you were drawing with a pencil. While less precise than the standard Pen Tool, it can be useful for organic shapes or quick selections.
Paths Panel
The Paths Panel stores and manages all paths created in your document. Here you can save paths, convert them to selections, and create clipping paths for output.

Layer Panel
The Layer Panel helps manage your document's layers, crucial when creating complex clipping paths that involve multiple layers or when applying the paths to specific layers.
Anchor Points and Control Handles
Anchor Points are the points you place along the outline of your subject. Control Handles extend from anchor points and control the curve of the path between points.

Selection Tools
After creating a path, you'll often need to convert it to a selection. Photoshop offers various selection tools and commands to help with this process.
Layer Masks
Layer Masks can be used in conjunction with paths to create non-destructive edits, allowing you to refine your clipping path without permanently altering the original image.
Step-by-Step Guide: Basic Method
Now let's learn how to make a path in Photoshop with our step-by-step guide:
Step 1: Open Your Image
Launch Adobe Photoshop and open the image you want to edit using File Open or the keyboard shortcut Ctrl+O (Windows) or Cmd+O (Mac).

Pro Tip: For better precision, zoom in to at least 100-200% using the Zoom Tool (Z) or Ctrl/Cmd + "+" shortcut.
Step 2: Select the Pen Tool
Select the Pen Tool (P) from the toolbar. Make sure you're in Path mode, not Shape mode, by checking the options in the top control panel.

Step 3: Start Creating Your Path
Begin placing anchor points around your subject by clicking along its outline. For straight edges, simply click to place points. For curved edges:
- Click to place an anchor point
- Click and drag to create a curve - this extends the control handles
- Continue placing points around your subject

Important: When drawing curves, the direction you drag the control handles determines the direction of the curve. The length of the handles affects how pronounced the curve will be.
Step 4: Complete the Path
Continue placing anchor points until you've outlined the entire subject. To close the path, click on the first anchor point you created. You'll know you're in the right spot when a small circle appears next to the pen cursor.
Step 5: Refine the Path
After completing your path, you may need to refine it:
- Select the Direct Selection Tool (A) from the toolbar
- Click on any anchor point to select it
- Adjust the position of the point or its control handles to refine the path
- Add new anchor points with the Add Anchor Point Tool if needed
- Remove unnecessary points with the Delete Anchor Point Tool
Step 6: Convert Path to Selection
Once you're satisfied with your path, convert it to a selection:
- In the Paths panel, right-click on the work path
- Select Make Selection
- In the dialog box, set a Feather Radius (0.5 pixels is a good starting point for most images)
- Click OK
Alternatively, use the keyboard shortcut Ctrl+Enter (Windows) or Cmd+Return (Mac).
Step 7: Apply the Clipping Path
Now that you have a selection, you can:
- Press Ctrl+J (Windows) or Cmd+J (Mac) to copy the selection to a new layer
- Add a layer mask by clicking the layer mask icon at the bottom of the Layers panel
- Use the selection to delete the background from your current layer
Step 8: Save Your Work
Save your work in multiple formats:
- Save as PSD to preserve all layers and paths for future editing
- For web use, save as PNG to maintain transparency
- For print use, save as TIFF or EPS with the clipping path embedded
Advanced Clipping Path Techniques
Once you've mastered the basics of creating a path in Photoshop, try these advanced techniques:
Creating Inside Paths
For objects with holes (like a donut or ring), you'll need to create inside paths:
- Complete the outer path first
- Hold Alt/Option and click inside the shape to start an inside path
- Draw the inside path as you would the outside
- When complete, hold Alt/Option and click outside the inner path
This creates a compound path that preserves transparent areas inside your selection.
Working with Multiple Paths
Complex images often require multiple paths:
- Create your first path and save it by double-clicking in the Paths panel and naming it
- Create additional paths for different elements of your image
- Save each path with a descriptive name
- Use the Paths panel to manage and switch between paths
Excluding Overlapping Shapes
When working with multiple paths that overlap:
- Create your first path
- In the Paths panel options, choose "Exclude Overlapping Shape Areas."
- Create your second path that overlaps with the first
- The overlapping area will be excluded from the selection
Applying Flatness Option
The Flatness option controls how precisely Photoshop converts curved paths to straight line segments for output:
- When saving your file, choose "Save As" and select EPS format
- In the EPS Options dialog, adjust the Flatness value
- Lower values (1-2) create more precise paths but larger file sizes
- Higher values (3-10) create less precise paths but smaller file sizes
Keyboard Shortcuts to Speed Up Your Workflow
Function |
Windows Shortcut |
Mac Shortcut |
| Open File | Ctrl+O | Cmd+O |
| Pen Tool | P | P |
|
Direct Selection Tool |
A | A |
| Convert Path to Selection | Ctrl+Enter | Cmd+Return |
| Feather Selection | Shift+F6 | Shift+F6 |
| Copy to New Layer | Ctrl+J | Cmd+J |
| Toggle Path Visibility | Ctrl+Shift+H | Cmd+Shift+H |
| Delete Anchor Point | Alt+Click on point | Option+Click on point |
| Convert Corner Point to Curve | Alt+Drag point | Option+Drag point |
| Toggle between Add/Delete Anchor Point | Alt | Option |
Troubleshooting Common Issues
Even experienced users encounter challenges when creating clipping paths. Here's how to solve common problems:
Jagged Edges
If your clipping path results in jagged edges:
- Try adding a slight feather (0.5-1.0 pixels) when converting to a selection
- Ensure you're using enough anchor points around curves
- Zoom in more when creating your path for greater precision
Path Doesn't Follow Contours Accurately
If your path isn't accurate:
- Use more anchor points around complex details
- Adjust control handles to better match the curves
- Zoom in to at least 300% when working on intricate areas
Struggling with Complex Curves
If you're having trouble with curves:
- Place anchor points at the start, end, and apex of each curve
- Don't place too many points - sometimes fewer points with well-adjusted handles work better
- Use the Convert Anchor Point Tool to adjust the curve type
Path Disappears or Isn't Visible
If you can't see your path:
- Make sure paths are visible (View Show Path)
- Check if you're working on the right path in the Paths panel
- Press Ctrl/Cmd+Shift+H to toggle path visibility
Industry Applications
Understanding how different industries use clipping path Photoshop techniques can help you tailor your approach to specific needs:
E-commerce Product Photography

In e-commerce, consistent product presentation is crucial:
- Create clean, white backgrounds for all product images
- Maintain natural shadows or create drop shadows for dimension
- Ensure paths are precise for high-resolution zoom features
- Prepare variants for different platforms and sizes
Fashion Photography
Fashion imagery requires particular attention to detail:
- Create precise paths around clothing items for catalog presentation
- Use paths to swap backgrounds for consistent brand aesthetics
- Implement paths for seasonal color variations of the same product
- Preserve natural fabric, draping and texture when isolating garments
Graphic Design
Designers use clipping paths for various applications:
- Isolate elements for composite designs
- Create clean cutouts for print materials
- Prepare images for layered designs
- Enable flexible repositioning of design elements
Advertising
In advertising, image quality and flexibility are paramount:
- Create multiple clipping paths for different campaign versions
- Prepare images for various media placements
- Enable creative compositing for conceptual ads
- Ensure print-ready precision for large-format applications
Digital Marketing
Digital marketers require adaptable imagery:
- Create assets that work across multiple platforms
- Prepare images that can be easily resized without quality loss
- Enable background swapping for A/B testing
- Isolate products for interactive web elements
FAQ: Frequently Asked Questions
What's the difference between a clipping path and a layer mask?
A clipping path is a vector-based outline that creates a hard-edged selection, ideal for objects with defined edges. A layer mask is a pixel-based method that can preserve semi-transparent areas, better for soft edges like hair or smoke. For professional product photography, clipping paths typically provide cleaner results for hard-edged objects.
How do I create multiple clipping paths in one image?
To create multiple paths:
- Draw your first path
- In the Paths panel, double-click "Work Path" and rename it
- Click the "Create New Path" icon at the bottom of the panel
- Draw your next path
- Continue this process for each path needed
Can I save my clipping path for use in other Adobe applications?
Yes! Paths created in Photoshop can be used in Adobe Illustrator and Adobe InDesign:
- Save your Photoshop file as PSD, TIFF, or EPS with paths included
- Open the file in Illustrator or place it in InDesign
- The path data will be preserved and usable
How do I make a selection a path in Photoshop?
To convert an existing selection to a path:
- Create your selection using any selection tool
- Go to the Paths panel
- Click the "Make Work Path from Selection" button at the bottom of the panel
- Adjust the Tolerance value in the dialog box (lower values create more precise paths)
- Click OK
What's the best file format for saving images with clipping paths?
For the highest quality and compatibility:
- PSD - For continuing to edit in Photoshop
- TIFF - For high-quality print with preserved transparency
- EPS - For use in professional print workflows
- PNG - For web use with transparency
- JPG - For web use when transparency isn't needed (the path information won't be preserved)
How can I improve my pen tool skills for better clipping paths?
Improving your pen tool skills takes practice:
- Start with simple objects with clear edges
- Use fewer anchor points - place them strategically at corners and curve transitions
- Practice adjusting control handles to create smooth curves
- Use a graphics tablet for more precise control
- Take advantage of keyboard modifiers (Alt/Option, Shift) while drawing
Is there a way to automate clipping paths for multiple similar images?
For batch processing:
- Create an action that records your clipping path process
- Use File Automate Batch to apply the action to multiple images
- For very similar products against consistent backgrounds, try Select Subject as a starting point
- Consider AI-powered tools for initial selections, then refine with the pen tool
Conclusion
Mastering how to create a clipping path in Photoshop is an invaluable skill for photographers, designers, and digital marketers alike. The precision and versatility of clipping paths make them essential for professional image editing workflows across numerous industries.
While learning to make work paths in Photoshop may seem challenging at first, consistent practice with the pen tool will quickly improve your efficiency and results. Remember that creating clean, precise paths is often what separates amateur-looking images from professional ones.
Whether you're enhancing product photography for an e-commerce site, preparing fashion images for a catalog, or creating assets for digital marketing campaigns, the techniques covered in this guide will help you achieve professional results every time.
Ready to take your clipping path Photoshop skills to the next level? Start with simple shapes and gradually work your way up to more complex objects. With practice, you'll be creating perfect paths in no time!
Recent Posts
Jul 13, 2026
Multi Clipping Path Services for Color Correction and Retouching
Jul 13, 2026
Professional Retouching Services in Dubai vs Basic Photo Editing: What’s the Difference?
Jul 12, 2026
Headshot AI Prompts That Actually Work: Examples for Clean Business Photos
Jul 8, 2026
What Is Product Photography? A Complete Beginner’s Guide
Jul 7, 2026
Best Clipping Path Service Providers: How to Choose the Right One
Fast, Flawless, and Affordable
Ready to Get Pixel-Perfect Results?
Tired of slow, sloppy edits? Upload your first 5 images for free and see the quality firsthand. No commitment, no credit card required.
Free trial — no card needed
4.9 / 5 rating from 500+ reviews
How it works
- 1
Upload your images
Send 5 photos for free
- 2
We edit them
Expert editors deliver in 24hrs
- 3
Review & approve
Love the quality, order more
Avg. turnaround12 - 24 Hours