Back to Blog


Guides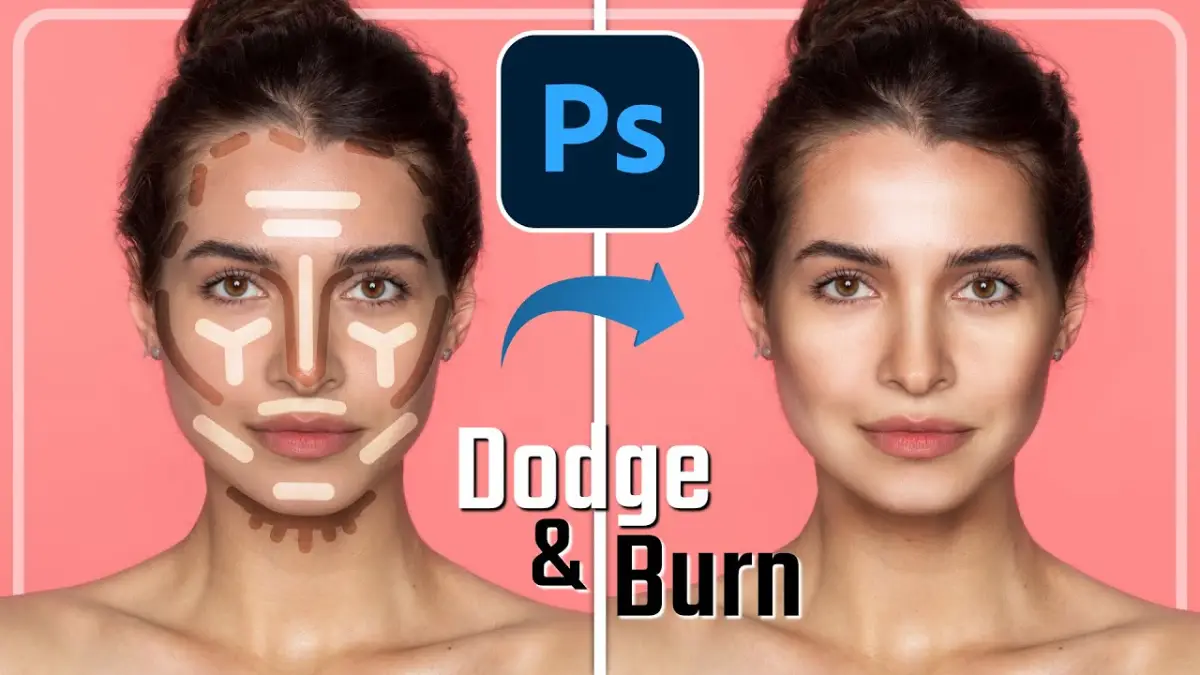
Dodge and Burn Tutorial: Step-by-Step Guide for Beginners
January 27, 2026A **dodge and burn tutorial** helps you improve photos by adjusting light and shadow in specific areas. This technique allows you to enhance depth, shape, and contrast without removing important details. When applied correctly, dodge and burn makes images look refined, realistic, and professional.
What Is Dodge and Burn?
Dodge and burn is a retouching technique used to selectively brighten (dodge) or darken (burn) parts of an image. Instead of changing the whole photo, you work only on targeted areas to guide attention and improve balance.
A good dodge and burn tutorial focuses on gentle adjustments that enhance the photo without making edits obvious.
Why Dodge and Burn Plays a Key Role in Photo Retouching
Dodge and burn is widely used because it offers precise control over lighting. Key benefits include:
- Adds depth and dimension to images
- Enhances facial and object structure
- Balances highlights and shadows
- Maintains natural texture
- Produces realistic, high-quality results
Unlike heavy filters or blur tools, dodge and burn keeps photos looking natural.
Tools Needed for Dodge and Burn Editing
Before starting a dodge and burn tutorial, choose the right editing software.
Adobe Photoshop
Photoshop is the most common choice for dodge and burn. It allows you to work with layers, masks, and blending modes for accurate control.
GIMP
GIMP is a free image editor that also supports dodge and burn techniques using similar tools.
Optional Accessories
A pen tablet can improve precision, but beginners can achieve good results using a mouse.

Dodge and Burn Tutorial: Step-by-Step Process
Follow these steps to apply dodge and burn safely.
Step 1: Prepare the Photo
Open your image and complete basic exposure and color correction. Cleaning the photo first makes dodge and burn more effective.
Step 2: Create Dodge and Burn Layers
Add two new layers and set both to **Soft Light** blending mode. Fill them with 50% gray:
- Dodge layer for lightning
- Burn layer for darkening
This method keeps edits non-destructive.
Step 3: Choose the Brush Tool
Select a soft brush with low opacity, usually between 5% and 10%. Low opacity helps you build effects slowly.
Step 4: Lighten with Dodge
Paint softly over areas that naturally catch light, such as cheekbones, highlights, or product reflections. Use light strokes for subtle results.
Step 5: Darken with Burn
Apply gentle strokes to shadow areas to increase depth and shape. Focus on areas that need more contrast.
Dodge and Burn Tutorial for Skin Retouching
Dodge and burn is especially effective for skin retouching because it does not destroy texture.
Benefits for skin editing include:
- Evening out skin tone
- Reducing harsh shadows
- Improving facial contours
- Preserving natural details
This makes dodge and burn ideal for portraits and beauty photos.
Helpful Dodge and Burn Tips for Beginners
Keep these tips in mind while practicing:
- Zoom in and work slowly
- Build changes gradually
- Frequently check before-and-after views
- Follow the natural light direction
- Stop early to avoid over-editing
Good dodge and burn work should not be noticeable.

Common Dodge and Burn Mistakes to Avoid
Beginners often make these mistakes:
- Using high brush opacity
- Over-lightening or over-darkening
- Editing large areas at once
- Ignoring existing shadows
- Rushing the process
Balanced and patient editing produces better results.
Dodge and Burn Compared to Other Techniques
Blur-Based Retouching
Blur removes texture and can make skin look unrealistic.
Comparison of Dodge and Burn Techniques in Photoshop vs. AI Tools:
|
Feature |
Photoshop Dodge & Burn |
AI-Based Tools (e.g., Evoto AI) |
|
Manual Control |
High |
Minimal |
|
Time Investment |
Time-consuming |
Fast |
|
Learning Curve |
Steep |
Beginner-friendly |
|
Automation Features |
None |
Automated highlight & shadow adjustments |
References :
https://en.wikipedia.org/wiki/Dodging_and_burning
Frequency Separation
Frequency separation is useful for texture and color correction, but does not shape light.
Dodge and Burn
Dodge and burn focuses on lighting, making it essential for realistic and professional retouching.
When to Use Dodge and Burn
A dodge and burn tutorial is most useful for:
- Portrait photography
- Beauty and fashion images
- Product photos
- Studio shots
- High-quality images
For quick edits, basic adjustments may be enough, but dodge and burn add refinement.
Suggested Dodge and Burn Workflow
For consistent results, follow this workflow:
- Basic exposure correction
- Spot and blemish removal
- Dodge and burn adjustments
- Optional frequency separation
- Final color grading
- Export
Export Settings After Dodge and Burn
Once you finish your dodge and burn tutorial:
- Export images as JPEG for web use
- Use sRGB color profile
- Compress files for faster loading
- Keep high resolution for printing
Optimized exports improve performance and visual quality.
SEO Benefits of High-Quality Photo Retouching
Well-edited images help websites by:
- Increasing visitor engagement
- Improving visual appeal
- Building trust with users
- Lowering bounce rates
Search engines prefer pages with strong visuals and good user experience.
This **dodge and burn tutorial** explains a powerful retouching technique in a clear and beginner-friendly way. By carefully adjusting highlights and shadows, you can enhance photos while keeping them natural and detailed.
Dodge and burn is a valuable skill for photographers, designers, and content creators who want professional-looking images. With regular practice, this technique can greatly improve your editing results.
Recent Posts
Jul 13, 2026
Multi Clipping Path Services for Color Correction and Retouching
Jul 13, 2026
Professional Retouching Services in Dubai vs Basic Photo Editing: What’s the Difference?
Jul 12, 2026
Headshot AI Prompts That Actually Work: Examples for Clean Business Photos
Jul 8, 2026
What Is Product Photography? A Complete Beginner’s Guide
Jul 7, 2026
Best Clipping Path Service Providers: How to Choose the Right One
Fast, Flawless, and Affordable
Ready to Get Pixel-Perfect Results?
Tired of slow, sloppy edits? Upload your first 5 images for free and see the quality firsthand. No commitment, no credit card required.
Free trial — no card needed
4.9 / 5 rating from 500+ reviews
How it works
- 1
Upload your images
Send 5 photos for free
- 2
We edit them
Expert editors deliver in 24hrs
- 3
Review & approve
Love the quality, order more
Avg. turnaround12 - 24 Hours