Color correction is just one step in the whole filmmaking process? but oh, what a difference it can make. You can take average footage and make it pop, sing and enhance your project viewing experience. If you have great footage, the sky is limited. On the day of shooting you can destroy the images of garish, ugly, and all the hard work of the buyers to capture and view the images of the buyers. The challenges and choices are many and it comes with great responsibility if you apply color correction and color grade.
In the world of indie film, jobs often come together and merge and color correction falls more and more into the hands of the editor. The lower the budget and the stricter the deadline ... the more often it becomes true. Shane asked me to take this opportunity and pass on some of the tips and tricks I have learned over the years in colorful features, shorts, commercials, music videos, and documentaries. I like to use Adobe CS5.5 for my colorful post-work and bounce between Effects, Photoshop and Premiere because I like the free integration it provides. I?m delighted to integrate SpeedGrade into my workflow as I?m part of the upcoming CS6 release. That said ... the tips I want to share with you apply to all color correction software.
To get on the same page, let?s quickly move on to some terminology that clarifies what this state is all about.
Color correction is a process where each clip is manually tweeted to get better exposure and balance of light. Each clip adjusts the color temperature to match the predefined choice for each scene. This tedious and mechanical process is necessary and in its way, an art form. The use of scopes (waveform, vectorscope, parade) is important for this step and fortunately, most NLEs and grading software have them built in. Apart from these you are flying blind and relying entirely on your eyes, which have to be adjusted regularly to the light environment of the house, fatigue, fun monitors, and other factors. Believe in the scope and let them guide you in making the right and creative decision.
Color grading is the creative process where the decision is made to enhance or place a new visual tone in the project through software that includes the introduction of new color themes, re-illumination within a frame, simulation of movie stock, color gradients, and many other choices. There?s nothing wrong or right about it being perfectly creative ... just think DP, director, and racist for the story. It can be subtle and invisible or top and Uber-stylized. There are challenges? election challenges. There are so many tools available, so powerful and often free (Devinchi Reliefs Light!) There's no excuse not to explore these options before you start your grading journey.
Lift-Gamma-Gain / Shadow-Midtones-Highlights / Blacks-Mids-Whites
These three interchangeable assignments are used to describe which part of the image you will work with. Each program uses one of the above 3 naming conventions but in short, they are all the same. You also rely on numbers when working with levels or curves but you still have 3 sliders (at least) to adjust. With these 3 controls, you can mold images almost at will.
Tip # 1 - Shot on a flat or log profile
Shane has learned from his extensive research and testing of each profile available that choosing a flat profile allows you to capture as much information as possible on camera. When I shoot on a Canon 5D MKI, I like to use minimal sharpness and contrast technicolor stylus or Canon Neutral. I am going to test similar flat profiles which are only available in four different flavors. Camera companies often have stock profiles that look contrasting and rich on camera but when analyzed on a monitor, you will find black and black blouses highlights. This is information that goes away forever and you can't get it back. We as filmmakers with hand tools, can't accept anything in stock! Just as the auto on camera is a recipe for disaster, so are stock profiles for rank amateurs. Move away!
Tip # 2 - Believe in waveforms, vectorscopes, and parade scopes
Go to the Window tab in Premier and select Workspace and Color Correction. Slightly press the RGB button at the bottom right of any window. It will reveal scopes and much more. Waveform = illumination. Vectorscope = chrominance. Parade = red, green, and blue values. I can?t stress how critical and essential it is to use these tools. Once you embrace the scopes, you?ll be confident about the plow through the footage and get instant visual feedback to make sure you?re making the right decision. I will not promote a calibrated monitor issue that is always hidden ($$$) and will only say that understanding and trusting the SCPS will get you 95% of the way home. Grab a Matrix Mini and use it to calibrate an LCD TV if you're in the pinch. This includes passing projects for broadcasting or passing QC for distribution. I put four indie features online in the Final Cut Pro using only Escapes that all passed QC for the first time. I was sweating bullets ... but I survived! Adobe has made it even easier for me now.
Tip # 3 - Management Order
It is important to do things properly to maintain image quality and store as much information as possible. Just as you don?t ice before baking a cake, it?s critical when you apply an effect. I have always achieved great results using the advice of Stu Maschuits. Correcting the color in your footage in this order will help you maintain an extremely high level of interaction with all the effects you use. Not all steps are required for each shot, but if you want to use them all, here they are:
Tip # 4 - Maximum color corrector in Premier is effective 32-bit, simple, and effective
This video effect is a great starting point for dealing with any shot. This one effect lets you address levels, saturation, image coloring, white balance, and more in real-time. The shot below shows how I raised the input black slider and added the contrast by placing the white input slider at the bottom. I used the color wheel to draw the orange to prevent the blue in the original image. You can use the white balance dropper to get the right starting point? but I like to draw the whole picture towards the orange and at least the 1950s film look. I increased the saturation by 40% healthy to pop the image. Finally, a 2.35 mat was added to the old cinemascope direction ratio estimate.
Tip # 5 - Adjust your lift/movies / black first
By adjusting your black case first you will get a baseline to balance your image. I want to work from the bottom and just kiss my blacks on the waveform with 0 IRE. I then pushed the whites up to expand my image and get some contrast in it. Finally, I tweeted MIDS as needed. You will notice that taking blacks or whites up or down will affect the whole waveform so give and take a gift while you are working backward. Mids don't affect blacks or whites too much and that's why you should work with them. Lastly, if you raise MIDS, you will lose the overall saturation of the image, so compensate by bumping up the saturation to keep the colors from popping.
Tip # 6 - Mids where the fax is live
MIDS is where the skin tones are and after you have a well-balanced image you can create a pop by raising MIDS. Sometimes it seems easy to increase the exposure at the premiere or after-effects to illuminate a look or scene ... but it raises all the layers equally and in the end, will not be as effective as separating the 3 regions. A good IRE for a properly exposed face on the waveform is 60-70 If you increase the MIDS too much, you will introduce the beast of digital sound, so use it judiciously!
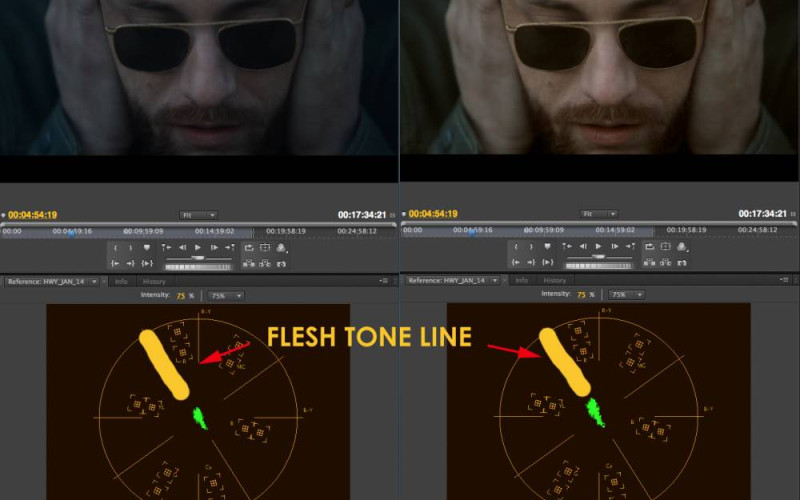
Tip # 7 - Look at the flash line on the vectors to see how far your skin tone is. On a 3-way color character effect, or in a plug-in like a color star, you can change the specific area of ??the color where the flesh tones are. By adjusting the color of the MIDS wheel you can introduce the right color to the face that needs twinkling. Move the wheel towards the side that needs more color on your face. See the section on removing skin tones until they line up with the fly line. An interesting note is that the FLESH line is perfect for all races and skin tones. We all share the same skin pigment that is registered as the number FLESH color. Proper white balancing will make it a secondary but still important adjustment. If you are going for a natural look then no one likes the pink, red, or green look. Saturation should be dialed at this point to give the flesh tone a natural look. Here is a subtle example of adjustment for the skin and a clear example to compare. Neither is right or wrong?.What seems right at the moment is not perfect.